This year my son is starting kindergarten. Kindergarten is the year they really learn to write, starting with their name and moving on to sentences, and journaling. We introduced writing a little last year in preschool at home and tried to keep up with it over the summer. I am exited to watch him expand his writing this year.
Writing is a fine motor skill activity that takes practice and endurance to master. As your child gets familiar with writing utensils and pencil grasp they will be more comfortable writing for longer periods of time. Work on forming letters properly by working from the top of the letter down. Practice tracing, free writing and writing on a line over and over to help your child learn to write naturally.
Handwriting is a skill we often take advantage of when jotting down notes, journaling, leaving a message for a friend or making a shopping list. All things you can probably do really quickly and not think twice about. Now think about how you would explain writing to a child… Where do you even begin?? Let me share all that I have learned while teaching my little ones to write.
Fine Motor Skills Needed to Write
Before we even get a pen or crayon to paper lets think about what is involved when we hold our writing utensil. Fine motor skills are skills that involve using the smaller muscles in our body, for instance writing on a piece of paper when just the hand is working. Our fingers are holding a small object and making small movements across the page. If we were writing on a chalk board or white board we would be using gross motor skills as your whole arm moves to make the letters and lines.

How your child holds the pencil or crayon will help you see how they are developing with their fine motor skills. Holding the pencil in a closed fist grasp vs a pencil grasp will clue you in. Work on helping your child make the “ok” sign with their fingers to help them build up muscles to be able to hold a pencil. As you work on writing muscles will develop and holding the pencil will get easier. A game we play is making the “ok” sign and then singing a song like “Baby Shark” and opening and closing our fingers along with the song. This is a great exercise to build up smaller finger muscles.
Proper pencil grip
There are a few different pencil grips that progress as your child develops and grows. I have a child in each of these stages so I was able to show these different grasps all in one photo. As you can see I have one lefty.
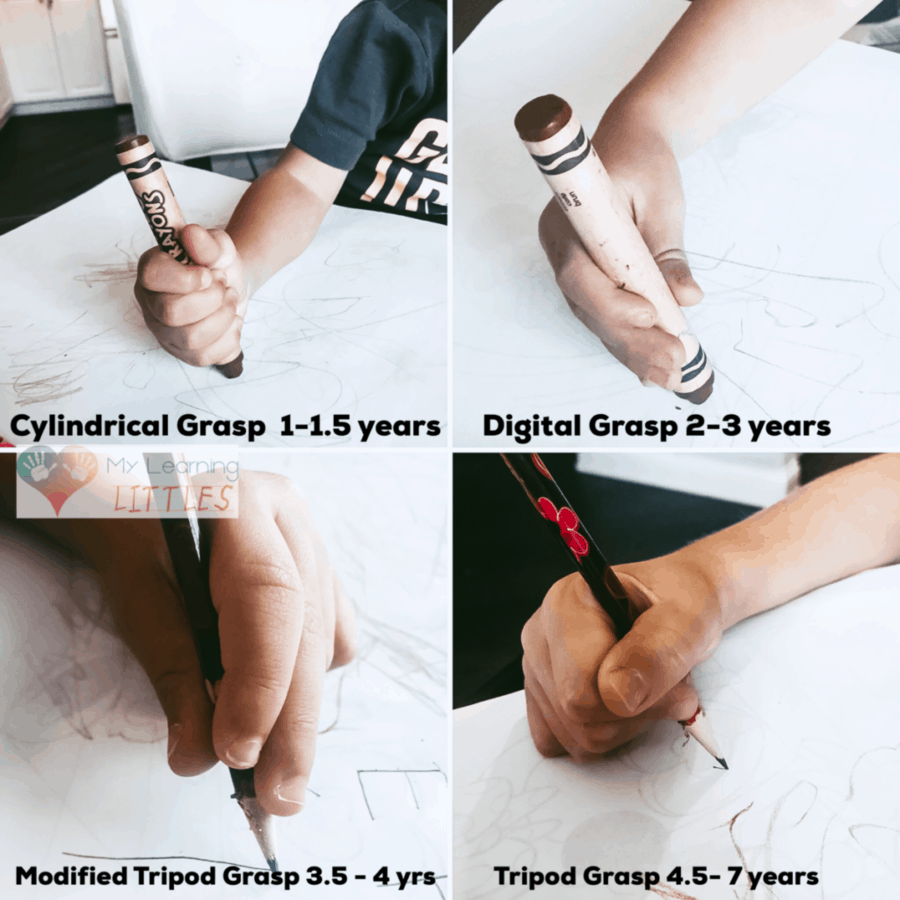
When your child starts to color for the first time you may notice them grabbing the crayon with their whole hand or Cylindrical Grasp. They will use their whole arm to color at this stage, moving their arm with their shoulder. This is an instance when they are utilizing gross motor skills to color. As they advance to Digital Grasp and use the tips of their fingers to hold the crayon they will begin to use the wrist and engaging smaller muscles, still relying mostly on the arm to move the hand. At this point my son holding the crayon is 2 years old and his coloring is mostly scribbles, swirls and lines.
As children work on more intentional shapes and letters their hands will move more carefully, fingers forming the shapes and arms only moving down the paper to an open space. As we introduced writing to my 4 year old we worked on pencil grip and where to hold the pencil. He currently uses modified tripod grasp when writing. As he develops his fine motor skills with our “Baby Shark” practice he will start hold the pencil better and have more stamina when coloring or writing.
When my son practices writing he often complains of being tired of holding the pencil. My current goal is to work on fine motor skills to get him to use the tripod grasp because it is the most efficient grasp and least tiring. Another way we work on building fine motor endurance is by coloring, painting, playing with legos, blocks and play-doh. For some other fine motor skill activities to check out this post.
Dominant Hand
When I took that photo above of pencil grips I realized my youngest has selected his hand dominance! I hadn’t realized it before but he is coloring and drawing with his right almost 100% now. So he tied up the household, we have 3 lefty and 3 righty. Most children show their hand dominance around two years old, just get some crayons and let them go to town coloring to see what had they prefer.
If your child isn’t showing a hand dominance yet work on fine motor activities to help them exercise the hand muscles. They will find their preference quickly and then you can help them more when writing and coloring. The most important thing is to not force them to use one hand over another. It makes learning much more difficult. As I was helping my daughter learn to write she would ask how to form a letter. She is right handed and I am left. I had to differ to my husband (right handed) to help her because I couldn’t explain the “translation” from my left handed movements to the right. Imagine forcing a child to use the non dominant hand and they would have to constantly be doing that translating for each letter they attempt.
Proper Letter Formation
There was a ton to consider before even getting pencil to paper. But now that your child is holding a pencil and ready to write let’s talk about letter formation. Personally my quick handwriting for phone call notes or shopping lists is a combo of sloppy cursive and clear letters that sometimes only I can make out. To me its legible and I never gave it much thought until my daughter was trying to read a shopping list after I had written it. She said “I want to learn to write pretty like you”, which made me laugh but she couldn’t recognize most of my letters. As I volunteered in her kindergarten classroom I noticed how neat and correct all her teachers writing was. When writing on the board she took her time and made her letters clear even explain her lines and curves as she went. It dawned on me then that to help my daughter I would also need to learn how to print letters the way she was being taught, and take more care in writing until she knew letters easily.
Both of my older children started writing with a program called Handwriting Without Tears in preschool and my sister (the Occupational Therapist) uses this program with her patients as well. Handwriting Without Tears encourages students to start letters at the top of the letter and go down. This method is supposed to be easier and quicker as time moves on, think hand writing essays in class during high school or college. Here is a chart to help you visualize this method and it it can become an easy printable to practice with your child.

A great way to practice these letters would be to get a sheet protector and dry erase marker. Print this alphabet and slip the paper inside the sheet protector, encourage your child to trace each letter following the arrows and order they are drawn in. As they start forming letters say the directions out loud to help them. For “A” you would have them start from the top and say “Big Line” as they draw a line down, start again from the top and say “Big Line” as they draw the second line down and finally connect the two and say “Little Line”. Help them with all the letters and get in a habit of talking while you write.
In school and with most worksheets your child will be expected to write on a line. I have found writing on the line to be helpful and frustrating in different cases. At times writing on a line helps my daughter keep things organized, which she prefers. But when kids are just starting to write it can also be challenging to get letters all straight. My son seems to prefer writing without a line and when it is available he doesn’t always use it. Gauge your little ones progress and have them practice writing both with the line and without.
Fun Activities to Practice Writing
Remember practice is everything when it comes to learning something new. Now that we have learned to hold the pencil and form letters lets practice and practice to get out little ones writing on their own. Writing takes tons of practice, holding the pencil, moving fingers, forming the letters are all new concepts to a child. Here are some fun ways to build up skills and endurance.
- To help encourage the tripod grasp have your child hold a small eraser or coin under their pinky and ring fingers in the palm of their hand. This will encourage them to only use the correct fingers when holding the pencil.
- Vary the materials you use for writing. Using a shorter pencil, like a golf pencil will have your child change thier grip to hold it better. A shorter pencil will encourage the tripod grasp. Using a thicker crayon or pencil will require less effort and be easier to use for longer periods of time. Fatter crayons are also easier to use for younger children. Using a triangular shaped crayon or pencil will force the child to re-grasp and adjust fingers. Using different utensils will encourage variation and make it interesting.
- Prewriting lines are good practice for writing straight lines, tracing and fun. You can print out worksheets or make your own by placing two stickers on opposite sides of a blank paper then making dotted lines to connect them. Make some straight, some wavy, some zig-zag and some loop. Then have your child trace each line or place the page in a sheet protecter and have them trace with a dry erase marker over and over.
- After practicing letter formation a few times ask your child to draw letters in the air or trace them with a finger on a table or window. Write large letters and small letters and vary surfaces as they get better at memorizing the order lines are drawn in. Use your hand to guide them if needed.
- Use saving cream on a sheet pan or salt in a cake pan to trace the letters. This tactile way of tracing will appeal to our hands on kids.
- Use a small white board and dry erase marker with an eraser on the end. Have an adult write the letter and have the child follow by erasing the letter with the opposite end.
- Use stencils to write out all the letters and numbers. Give them colors pencils or colored paper to add a little variety. My daughter loves to trace letters for stencils even long after being able to write her letters.
These are the basics to writing, fine motor skills, holding a pencil and forming letters. Working on these three things will get your child writing. As they learn keep practicing and challenging them to write more.
Related Questions
What letters should teach a child to write first?
Writing lines and circles should be the first thing you work on when introducing writing. Starting with an X and an O when writing letters will be easiest for your child to start with. Letters that have half circles or cures will be a little more challenging. I like to also teach them letters in their name because they will identify with them much more quickly. More on that in this post on “Helping My 4 Year Old Write His Name”.